Showing posts with label Sewing. Show all posts

Friday, 12 December 2014

CHRISTMAS: Festive Cross Stitching

If you haven't been able to tell, this Christmas has been rather productive on the cross stitching front. Aside from the cross stitched Christmas cards I shared previously, I've been working on some festive stitching projects - couple of tree hangers and a grumpy old sheep.
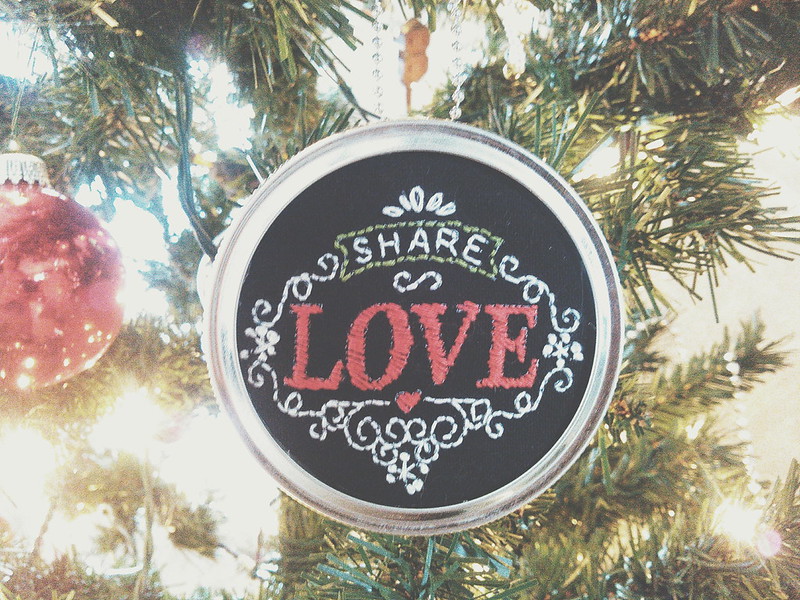
Love

I have to admit this Dimensions kit (#71-08932), annoyed the life out of me because embroidery is not my talent and the wording for love got pulled out far too many times to count. Satin stitch is not were my stitching talents lie. I'm too much of a perfectionist when it comes to stitch work and it's far from perfect but it got to the point where that was as good as it was going to get any time soon. Anyway, Share Love is something we all could be doing more at this time of year, like I said on twitter the other day - share love not a 101 wish lists.

Baaa Humbug

Baa Humbug by the Cross Eyed Cricket ( #21 from 1989) is the second sheep I've stitched by this company - they always design them so well. I have to admit, sometimes I feel and look as cranky as the sheep does when it comes to Christmas - too many years in retail does that to you. 
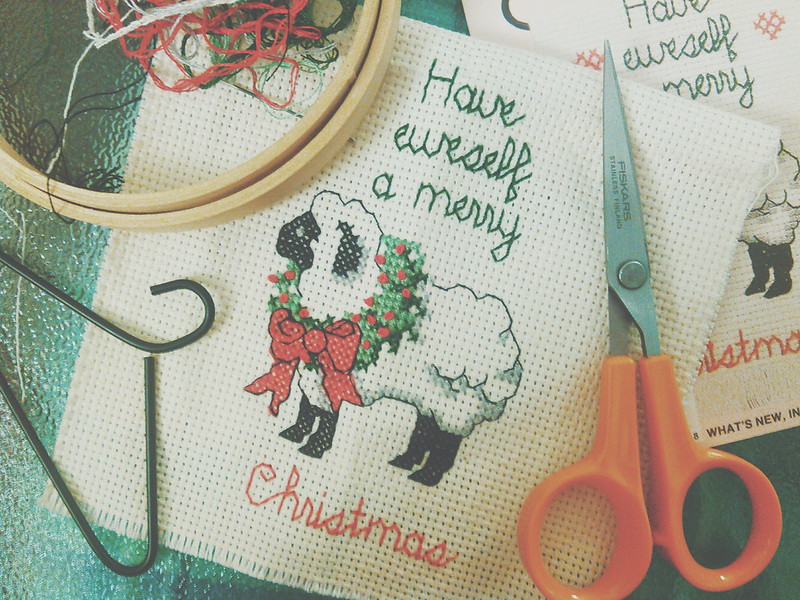

Cross Stitch

The sheepie hanger design was an old 1980's sewing kit I found at an estate sale. It had been opened but never started so it was my little mission to stitch it. Actually completed it in a night and I love the way it turned out. Those French knots in the wreath make all the difference.

So that's all my Christmas stitching for the year. It's a shame they'll only be out for a month every year but it'll be fun digging them out in the future and adding to the collection.
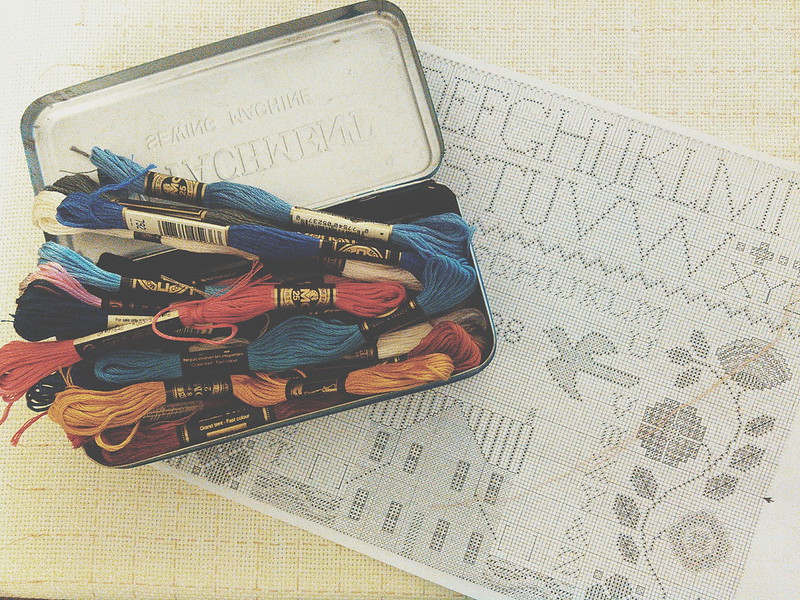
Sampler
Now I'm busy working on a large City Stitcher sampler - something to get my teeth into and slow me down a little.

Thursday, 14 November 2013

PROJECTS: Cross Stitch Completion Mission

Cross Stitch

Give me any cross stitching project and there's a high chance i'll give up sewing it 3/4 of the way in. Why?! I get too distracted by the next project I intend to do that I begin daydreaming about in my head whilst sewing the cross stitch I'm trying to finish, give up on it shortly after and start the new one.

Sewing in such a manner left me with five, yes five uncompleted projects all lined up in my sewing pile. All from the last year, all nearly completed, all so nearly completed but never done. So the last couple of weeks I made myself finish at least a couple of the projects before my hands wander onto yet another piece of stitching. 

I actually ended up completing three, all sewn, finished, backstitched and framed as new additions to my embroidery hoop wall (although one was a Christmas design for a card which I'll be blogging separately in a couple of weeks). Both the patterns, frames, material and floss were all from estate sales which I find the perfect place for getting supplies really cheap and funds my addiction while saving money.

Cross Stitch Cross Stitch

In fact the 1919 beach scene was an unopened 1979 vintage sewing kit I found at a sale and turned out to be my first cross stitching design sewn upon linen (as someone who has been stitching since I was five it's somewhat hard to admit). Originally it was intended to be rectangular with a simple brown cross stitch border, the backstitching of the place and date to the left of the design which did make it look more dated, I was rather impressed myself how much a simple change of moving stitches and framing it in a hoop actually made. It pays to explore and adapt patterns as you see fit.

Cross Stitch Cross Stitch

Before I began stitching the beach scene I was midway through the flower bouquet - a design actually stitched using only one thread which creates a very blended colour scene to the picture. I don't normally tend to be a fan of flower designs (I say that with two flower designs now on the wall) but they don't tend to be my favorite things to sew but i'm impressed if I do say so myself how this one turned out.

Admittedly there still sits another two unfinished cross stitching projects to complete, seeing the success of this mission they'll be lined up for the next completion challenge. But there's only so much I could do before I got truly tempting into stitching a lighthouse design I picked up at said lighthouse during our Michigan roadtrip last month.

Cross Stitch Wall

What have you been crafting lately?

Tuesday, 30 April 2013

CRAFTS; Recent Crafty Goings On

I've refound my crafty vibe over the last couple of weeks which has finally made me finish off a lot of the projects that were half started - I often get to a project being three quarters done and then think about what crafty thing to do next and never end up finishing the first one. So, after pinning more cross stitch patterns then i'll ever have the time to do, I've been challenging myself to not starting anything new untill I had at least finished two of my on going projects, finally I'm getting there. 

What's important to me is crafting on a budget, reusing old things, framing things when I can just to keep the costs down. Crafting can get crazily expensive if you do a lot, so most of my threads, fabrics, patterns and aida material I've all been able to pick up really cheap from estate sales. A lot of it is vintage - especially some of the embroidery threads but they don't date at all and it's great being able to use them in projects still. Aside two of the yarns in the crochet project and the embroidery floss for the sheep, everything is second hand.


This super cute cross stitch pattern was one I picked up because of how sweet the sheep all look in their different "styled" fleeces. Starting this at the end of last year, the winter darkness kind of delayed me finishing this piece but I love how it turned out. Now to just find a frame for it!


Then I took to finally doing something with three stuffed fabric hearts I managed to find at an estate sale, so along with all my other supplies (again all estate sale pickings) I managed to turn them into a drop down row of three hearts (there's probably some crafty name for this but I'm unaware of it). With just cotton, lace edging and buttons it's a wonder what you can get up to with a spare half hour and it now cheers up the bedroom.


1970's eat your heart out with this vintage cushion - this was a crewel kit, unopened from the 1970's, the colours were much more gordy in the images so I was hesitant at first but I love how it turned out. I actually brought it to resell, but our sofa has been lacking in cushions so cosy comfy needs came first. This was my first time at crewel work which is basically embroidering with wool, I picked up some new stitches and it was a great quick little project.

So after finishing more then the two projects I had challenged myself to do, the last week I've been working on two great new projects - another cushion this time in crochet and a new cross stitch pattern - both found on pinterest.


I'm a week into this cross stitch which is based on a vintage French soap advertisement. Even though I've been cross stitching over 20 years (I started when I was 5-6), I still need my lines to know where I am, but the more I stitch the more I notice how much of a perfectionist I am with my work especially with colour choices - this pattern came without a colour guide so it's all my own choices, i'm still a little unsure with regards to the yellow tones, but the more I sew around it, the more they seem to blend.


Lastly I want to show you something I picked up at an estate sale at the weekend - it's basically a vintage hard case camera bag although at first I thought it might have been a vanity case. Either way it was only $4 so it was coming home with me. I had mixed ideas about either reselling it or turning it into a box for my embroidery floss seeing they were bursting out of where I was originally storing them. The embroidery floss won, and actually it makes a very good sewing box, maybe one day when we're rich enough to afford a DSLR - my little bridge camera drowns it in, it'll find it's way back into being what it was originally intended for.

I'd love to hear what crafts and projects your currently working on?

Monday, 17 December 2012

So yeah, life

Sometimes life just gets in the way, I've been immensely busy (in a good way) with my ebay auctions since thanks giving to the point that the only time I'm leaving my front door is for trips to the post office but it's proving to myself I could and can make a success of the reselling lark. Then our internet went down for two days which led to late night trips to starbucks just to do work. Anyway's bloggings been a bit of a second thought so I haven't had the time nor the will to catch up myself. So i'm rolling myself back out there with some of the more quirky vintage finds i've come across lately. 

This was a real find - a "Tool Kit for the Bride" a mini, say doll house sized package of versions a bride needs to keep her husband in line. It wasn't even opened and was too funny to pass up - it comes with a rolling pin, washing powder, iron, broom and cook book. It found its new home within hours of going online. 

While not sure how rare or even useful this piece is but it's certainly a quirky piece for a sewer to have. It's basically called a "Dial-a-gram", which designed to bring "sewing to your fingertips" dates from 1955 which spins around depending on the fabric your sewing with giving suggestions for the best threads, needles and stitches to use. 

Vogue sewing books and magazines really are a delight to come across, I could hours just pouring over the stylised images within them. Take this 1958 Vogue Sewing Book for example - aren't just dresses just lovely? It even convinces me to try use get my sewing machine even more.

Now this last item is one I'm giving you a sneak peek at as I haven't got around to uploading it to either of my stores. Elbows Off was a pamphlet published (if I remember rightly) in the 1950's for the Men and Women of General Motors addressing the ways and means when it comes to table manners. It covers everything from what a guest should bring their hosts to topics of conversion and table settings. If you're interested in this then drop me a message one way or another.

It's finds like all of the above that keep me searching and selling.

Thursday, 6 September 2012

Patchwork


Sat in my sewing corner for the last ten months has been one 1948 Kenmore 95 Rotary sewing machine. The Sears cabinet suffered a hinge death on it's move into the apartment and without any instructions we had trouble not only finding a replacement but knowing how to thread the machine. But a crafty girl breaks sometimes, when there's a machine that she can't use. A failed attempt at buying a replacement hinge and feeling the need to use my fabric goodness lead me to a tearful angry moment of threatening to throw the machine out. Said anger lead me to reconstructing the sewing machine table [you can see how it looks within it's cabinet look here] to make it usable and with a copy of the original instructions I was ready. I had no purpose or method to my sewing. I just needed to sew. Anything. It turned out I created a cushion for my sewing chair. It's rough, it's a little uneven but to me that's beside the point. It was just something I needed to do. 

Sewing anger lead to finally see past the broken hinge and I'm going to use my machine regardless. A broken hinge will not stop me any longer and hopefully my sewing adventures will continue. She's a jolly good machine too, granted not as visually pretty as my 1934 Singer with it's engraved flowers and the like - she's industrial, well built and certainly of her time. But, man can she sew. Actually goes fast enough that the thread breaks. The fact that it can only really go forward and backwards is welcoming to me - less ways to get confused and weirdly enough is powered not by a foot control, but a knee one. 

Speaking of old sewing machines ...


I think remembering I had to leave this sewing machine back in the UK was adding to my hinge anger. Sadly I wonder if this old gal will be able to ever move - being cast iron she certainly isn't the lightest of objects [I can barely carry it]. Additionally I doubt I'd use her in the US as she'd need another power change - she's already 78 years old and been adjusted from a treadle to electric. Maybe once we're flush with money I'll get her here as a display piece.

Do you have an old sewing machine? I'd love to hear all about it!

Thursday, 12 July 2012

Cupcake painted embroidery hoop

DIY cupcake hoop featuring DecoArt Ink Effects

I love an excuse to add to my embroidery hoop wall, so when I was chosen to receive the new range of DecoArt Ink Effects I was really excited to give them a try. The DecoArt ink effects allow you to paint and then transfer your design onto material. I love all things cupcakes - both eating and making them so I knew I wanted them to feature, but before we get to the project, lets see what's available and what the product is all about.

The DecoArt Ink Effects is a range of 12 colours formulated to be painted onto paper then transferred using an iron onto material. In addition the basecoat allows you to work with cotton materials [any material with more than a 30% blend of cotton the basecoat is required] enhancing the colouring and quality of the transfer. More so even after transferring, the material remains soft and flexible, they even survive a cold wash making them perfect for adding details to white and/or light coloured clothing or home decor.

DecoArt Ink Effect Products
Drawing

So onto the project - redrawing a design from ones found in the internet I took to painting. Because your transferring your painting you need to paint everything you want to transfer - be it the tiniest detail to outlining. After you've painted your design you need to wait at least 45 minutes for it to dry.

As my material was 100% cotton I had to use the basecoat - it took a while to get the hang of how to apply this product and you need to give it a good shake prior to application and spray liberally. When you're ready to transfer make sure to place something under your material so it doesn't additionally copy onto your ironing board. Place your painting face down over the material, cover with another piece of paper and you're ready for ironing! Set it to the cotton setting and keep a constant firm moving motion over the design for a good minute to make sure the full colour is being absorb into your material.

Ironing
DecoArt effects transfer

As you can see from the image this product is one that you learn by trail and error [and that's what you come to learn through using this product - it something you teach yourself how to do which is part of the fun of using it]. The image on the left was my first attempt and my cupcake on the right is the final image. You can see the difference in colour quality and the original basecoat problems and comes to show why you should test your images on scrap material beforehand. Once you get it right - it's really worth all the hard work getting there!

crafts

I did find outlining with the paint difficult so I wanted to add embroidery detailing. With the transfer leaving a lot of life in the fabric - it's still soft and flexible enough to embroider straight onto the transfer.

Overall I'm pretty impressed with this DecoArt Ink Effect paints -  although you really do need to have the patience to practical and make sure you're getting it right. Once you do - the results are mighty impressive and there's tonnes of projects you could make with this product.  For me they worked really well as a basis to then go on an add extra detail.

You can find out more about DecoArt Inks via; Facebook  // Pinterest // YouTube // Twitter

Would this be a product you'd be wanting to try out? What projects would create with the ink effects?

These items were provided for my consideration and I have been compensated for this review. Nevertheless all thoughts are my own.

Monday, 2 July 2012

Photograph an hour: 28th June

I always love "a photo an hour" posts particularly those by the ultra cool Kaylah at The Danity Squid. I wanted to do something similar to actually prove to myself that although I'm not working I do actually do stuff. While I'm hunting for a job I don't search the net for one everyday - that would get at me too much and make me too depressed about trying to find something and not getting anywhere. I kinda forgot to take a photograph at tea time but you'll get the idea!

Day in photos
8.30 - Waking up and finishing off a brew in my fav mug. 

Day in photos
9.30 - Make up time.

Day in photos
10.30 - Baking peanut butter cookies.

Day in photos
11.30 - Writing out online recipes.

Day in photos
12.30 Dinner covered in brown sauce!

Day in photos
1.30 Checking the insane 36 degree heat

Day in photos
2.30 Taking the recycling out

Home
3.30 Editing photographs for blog posts

Day in photos
4.30 Embroidering

Day in photos
6.30 Cross stitching

7.30 Walking our friends one eyed dog, Lugi

Day in photos
8.30 Chilling with Edmund

Day in photos
9.30 Reading the mail

Have you ever done a photograph an hour post? Leave me your links!

Tuesday, 19 June 2012

Dragonfly cross stitch

Dragonfly cross stitch Dragonfly cross stitch Hoop wall dragonfly cross stitch
There's a new addition to the embroidery hoop wall after completing my cross stitch dragonfly [the pattern for which came out of the Cross Stitch Magazine]. This project was something I really got into but with only just one colour it started to drag out a little, and it became something I'd pick up every now and again. But being only four lines of the wing away from the end got me on a sudden drive last week to finally finish it off and hang it up. It's sewed completely in metallic DMC thread which in itself can be a bit of a nightmare - I had one lot of thread that tangled itself up every other stitch and another thread that was a dream. That's just the luck of the draw. I love it's size - which makes it such a statement piece [the sewing is ten and a half inches at its widest and its framed in a 12 inch frame].

Now just need some more ideas for more embroidery hooped pieces!

Friday, 25 May 2012

Pipe Dreams and Patchwork

Patches Patches

Patchwork was one craft I always grew up around. My mam use to do it on and off for years but never really seemed to every finish anything major with it. I think that's one of the downsides to this craft - it can take a lot of time but designing, cutting and sewing before you start to make an indent in your design. I've made the odd couple of cushion covers before but only using the hexagonal shaped patches which are pretty easy to cut, make and sew together so I wanted to try and make something patchwork based to add to my hoop wall. The beauty of patchwork is that you can pretty much use any fabric you come across - mine being from the discount aisle of JoAnns, the fabric bags sheets come in to an old pair of jeans. Its recycling or maybe even up-cycling - in a crafty, pretty way. 

Patches Patches

Recently I've been having a pipe dream of making something similar and opening a shop on Etsy for things like the above and perhaps some crochet work. Sadly I don't know if my craftsmanship is up to it because they are obviously handmade and or if people would want to buy them. What do you think?

Wednesday, 16 May 2012

How I fixed a vintage powder compact

blog


So as I've hinted, one of the exciting goodies we found at Saturdays estate sale was a vintage compact - the first I've ever found at such a sale. To say it's seen some use would be a massive understatement but regardless of it's condition I couldn't leave without it. I always have it in my head that it's better being with my collection were it will be loved and looked after, cleaned up the best I can and welcomed then going into the trash. I want to rehome them all. I saw it's potential and then again it was only 75c.

As for it's details it's probably from the 1950s, it's a simple compact and still has a sturdy, strong hinge which is always a plus yet its missing a puff, sift and even it's top decoration which may have been a slab of say mother of pearl like my Marhill compacts. Additionally the mirror [after a clean] is in good condition so I originally considered using this one as a spare for parts. Then I had an insane brainwave [they occur sometimes and are painful] in which I thought why not create a brand new top for the compact and what better then sewing something pretty?!

I found a small rose cross stitch in the pattern book I also picked up from the estate sales and went about sewing it which only took a couple of hours. After cleaning up the compact, particularly on it's top were the two would be glued together - it was time to see if the idea would actually work! There's plenty of compacts out there with stitching designs on them [I already own one by Kigu] so now was time to make my own version.

Cutting out a piece of cardboard the same side as the indent on the top of the compact I used this as a mounting piece to glue the sewing too as I've done many a time sticking fabric to canvas. Carefully wrapping the material around and gluing it tight I then used the glue gun to attach it to the metal casing. It stuck perfectly! 

It's not perfect but it's far better then it once looked and I'm glad I managed to morph two of my loves together and give this compact a new least for life.

PS. There's a tiny little poll to the top right of this blog about what you'd love to be featured more of on LOTS. I do these polls from time to time just to make sure I'm keeping you all interested!

Thursday, 3 May 2012

My sewing corner

Sewing corner
Music score
Books
Roses

Every crafty girl needs a space that's hers and I've finally got around to making the space in the corner where my sewing machine sits, mine. My Standard Book of Sewing, an estate sale find, goes so far to suggest "your sewing corner should have sufficient light ... [with] enough room for your sewing machine, a comfortable chair, a footstool ... and easy to reach shelves ... on which may be placed boxes and jar for buttons and other sewing accessories". Okay so my corner needs more work but we don't have a huge apartment so we're fighting for space with all our collections between us but I wanted to mark this territory as my crafty zone. Lets call it a work in progress where my sewing and my vintage things sit happily together.

Starting with a few old music scores from of my favourite musicals - High Society and My Fair Lady [I also have Moonlight Bay which is waiting to be added to the wall] all picked up from a flea market in Pickering [UK] - one day I intend to get them framed properly rather then using drawing pins. To my somewhat small collection of sewing books sitting proudly on my sewing table of which I want to keep adding to. The sewing box if you remember I picked up for a steal of $7 in Frankenmuth and is my treasure trove where I keep all my sewing basics - from threads, needles, scissors to some sewing kits for future use. Lastly I had to resort to the student faithful of reusing bottles, in this case a tequila one for a vase for what was remaining of the surprise flowers from my guy. And of course, the pile is all neatly topped off with a boxed 1969 vintage Avon powder compact which is now on eBay [hint hint].

Do you have any special "me" corners where you live? Where do you craft - I'd love to hear!