
Tie dying seemed to pass me by as a child - I'm not really sure why, it just did.. But finally at the age of 26 I got to try it out for myself when I received a package of Tulip Tie Due and Paint Kit alongside some Tulip Glam It-Up! Iron on Fashion designs from iLoveToCreate. Being fully settled into American life I wanted to go head strong into the Halloween theme because while Halloween is big in the UK, it's nothing compare to the USA. It's like everywhere.
The goodies iLoveToCreate sent
Shopping list;
- Tulip tie-dye and paint kit which includes ink, bottles, fabric paint, rubber bands, gloves and instructions
- Tulip glam it-up fashion iron on designs
- Material
- Sewing machine [or you could hand stitch]
To the fun fun!
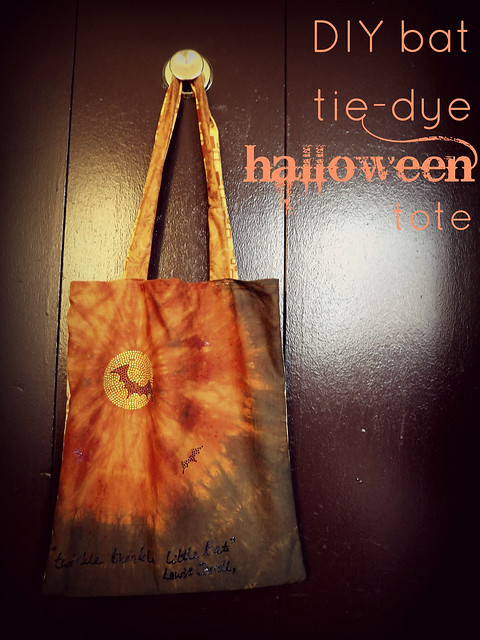
The Tulip tie-dye box provides great instructions - especially for a novice like myself, not only that but it provides you everything you need - sorted!. Starting with mixing the provided colours [lovely Halloweeny orange and black] with water and shaking so it mixes well it's time to start the tie dying. I was using a material that was already orange but I wanted to make it not only multidimensional but I wanted to produce a radiating circular form from the top corner to then being dyed black to represent a moon and the dark sky - at least in theory.
The Tulip tie-dye box provides great instructions - especially for a novice like myself, not only that but it provides you everything you need - sorted!. Starting with mixing the provided colours [lovely Halloweeny orange and black] with water and shaking so it mixes well it's time to start the tie dying. I was using a material that was already orange but I wanted to make it not only multidimensional but I wanted to produce a radiating circular form from the top corner to then being dyed black to represent a moon and the dark sky - at least in theory.
Pinching up the corner of the fabric I attached the first rubber band and carried on doing so at irregular intervals, I have to be careful because our cats love to play with rubber bands! Anyways ... the bottles in which the tie dye is mixed have great nozzles so you can really get in between the fabrics or miss parts out - whichever you prefer! Be warned it is a messy craft [I could see this being great fun with kids] so make sure you work on something you don't mind messing up and reminding me somewhat of the mess I create when hair dying. After application wrap it up in cling film [I didn't have any so I used a plastic bag which worked just as well] and left it over night to set, but you only really need to leave it a good 6 - 8 hours.
After leaving it to set you'll want to wash it to get rid of any excess ink so you'll probably want to keep those plastic gloves because the ink gets everywhere. When dried your ready for the next steps. Taking the bat Tulip Glam-It-Up fashion design you merely peel the back of the plastic off, place it sticky side down upon your fabric, cover with some and then iron on holding it in place for a good 40 to 60 seconds. After it's cooled you need to iron the back too. You do have to be incredibly careful with the iron on designs because as you can see from my attempt the little sticky crystals fall off really easily - but once they are ironed on they are certainly stuck!
The Tulip Tie-Dye kit also came with some great paints - a black fabric paint and a glow in the dark shade. If you know of Alice in Wonderland you might recognize the "twinkle, twinkle little bat" quote I wrote in the paint fabric upon the bottom of the fabric as one recited by the Mad Hatter. The fabric paint takes four hours to set and once it's set you're done!
The final step is to create your tote. Using another tote as a guide I took another piece of fabric [totally unmatching to the front but certainly still in the autumnal theme] sewing around the three edges and hemming the opening. It's best to reinforce your handles with a lot of tight stitches back and forth and then you're sorted.


Not too bad an attempt for the first go at tie-dying and tote construction don't you think?! While I may be a little old for trick or treating it'll certainly get some use when shopping and hitting estate sales!
All these items are on sale in JoAnn Fabric Stores until November 3rd and you can find out more about iLoveToCreate by visiting these links;
Make sure you check out what other bloggers have been making with their goodies!
Inlinkz Linky Code:
Disclosure - I wrote this post as part of a paid campaign with iLoveToCreate and Blueprint Social. Regardless all opinions expressed are my own.
amazing. i love it. i've been wanting to try tie dye for ages! x
ReplyDeleteI wish i'd tried it sooner - it's rather fun in all it's messiness!
DeleteThis is so cool! I love the Lewis Carroll quote...you should enter it at the Altered Alice that quote is the theme this month :)
ReplyDeleteYour tote turned out so cute. I tried a tie dye project for this campaign and it was a total fail. Doing a tote was my first idea, but I went a different route. Now, after seeing yours, I want to make a tote! :)
ReplyDeleteIron on is one of my favorites! Love the tie die tote! I have been wanting to try it too but have been too scared to mess it up. I love how yours turned out!
ReplyDeletei really love the tye dye - it's perfect colors
ReplyDelete<3 katherine
of corgis and cocktails
I love this, we used to do tie dying at Girl Guides but I haven't really done it since, this bag is awesome!
ReplyDeleteCharlotte
this is awesome!
ReplyDeletei love halloween and all things thus themed ^_^
Rosie xo
A Pocketful of Rosie
Wow! I love Halloween, I've already started making my costume for this year. I can imagine it's really huge in America and a real tradition. Love the bag you've created.
ReplyDeleteI've not done any tie dying for years, but I used to love doing it in my Mums back garden and hanging all my freshly dyed clothes out to dry afterwards xxx
You made a tote!! That is way too cool! Love it!
ReplyDeleteIt's so neat how the orange and black tie dye just seems so Halloween. It just fits. ;) Love the little bat and quote!
ReplyDeleteI'm not really into Hallowe'en but I'd love a bag like that! x
ReplyDeleteI'm totally afraid of bats, but this tote is great!! Makes me excited for Halloween! xoxo
ReplyDeleteYour Halloween tote is so adorable. You did an amazing job.
ReplyDeleteTracy @ Sunny Days and Starry Nights